Braided Pipe Cleaner Bracelet

You will need 3 pipe cleaners and 5 beads that have a big enough hole for a pipe cleaner to fit through.

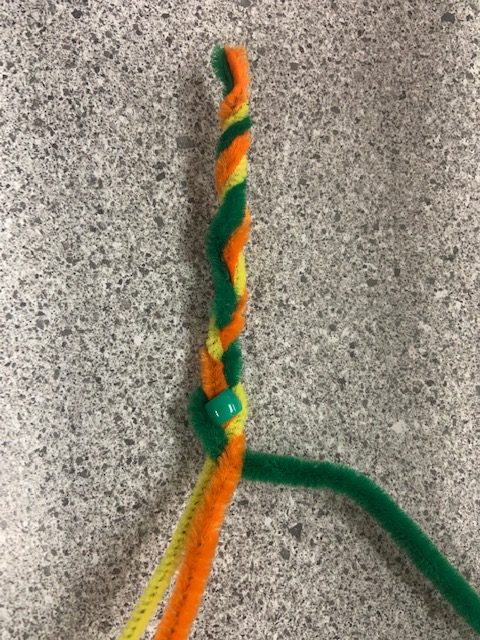
Begin by lining up the ends of the pipe cleaners and twist them together several times, until about 1 inch of the pipe cleaners are twisted.

Braid the pipe cleaners until 2.5 inches are braided. Add a bead to the pipe cleaner in the middle, pushing it down against the braiding. Continue braiding around it, again until that beaded strand is in the middle again.

Repeat these steps for adding the third, fourth, and fifth beads. (There may be a few extra included.) After adding the fifth bead, braid another 2.5 inches. Twist the rest of the pipe cleaner ends together, just like at the start. Cross the ends of the bracelet over each other. Keeping the ends pinched together, slide it onto your wrist to make sure it will fit. Twist the ends of the pipe cleaners together, closing off the bracelet.

Bookmarks

For this craft you will need colored paper, glue, and any other decorative additions like glitter or markers.

Cut a bookmark sized piece of paper. Then cut out different shapes and decorate it however you wish. We used paper scraps with a leaf punch for ours.

Crayon Transfer Craft

You will need crayons, a pencil, and white paper for this craft.

Start by coloring one side of your paper either in patterns or blobs, however you wish, just as long as you press hard and cover the whole area in crayon. The picture below shows an example of this started.

Lay your pattern face-down on top of another blank sheet of paper. On the back, draw a design in pencil. ( You can see the colors from step one on the back side of this page below)

Lift up your paper and check out your design! You will see that your pencil drawing transferred to the other page in the colors you drew. So it will look rainbow-like.

Have fun experimenting.

Hot Cocoa Craft

For this craft, you will need a scissor, glue (hot glue may be needed just to glue the cup to the plate, otherwise liquid is fine), a paper plate ,a paper cup, some cotton, brown paper, and colored paper for a handle.

Begin by gluing the side of your paper cup to your paper plate. This is your cocoa mug. You will then cut a handle out of the colored paper and glue it next to your cup. Next, take some brown paper and scrunch it up, sticking it inside the cup. This is your “cocoa” Glue the cotton above to create the “steam”. Decorate the plate and cup however you wish to add the final details.

Ghosts

For this craft you will need a black marker, string, scissors, a white paper or foam cup, a pencil or something to poke a hole in your cup, white paper or streamers, and glue.

Poke a small hole in the top of your cup. Take your string and fold it in half. Thread the ends through the hole, so the loop is above, and tie the ends in a big knot (you may have to double knot it). Then decorate your cup by drawing a face. To add streamers, cut your paper into strips and glue them around the base of the cup. Enjoy!

Paper Strip Pumpkins

For this craft you will need 3 large orange paper strips, 1 green small paper strip, scissors, tape, and a black marker.

First take two orange strips of paper and make each one into a tube. Use tape to tape the ends.

Then, draw a face on the middle of the last strip of orange paper. Thread it through the tubes and secure with tape in the back. (You may need to adjust the tubes).

Next, take your green strip and create a stem, as the picture shows. You can tape it into the top of the pumpkin, wedging the ends down between the two tubes. If you would like to trim it smaller, this would be the only need for a scissor!

Enjoy your pumpkin!!

Paper Bag Scarecrows

To make these scarecrows you will need a paper bag, markers, glue, and construction paper in various colors.

The bottom half of the paper bag will be the face. The top half will be the hair. Color the top half of the bag a straw color and then make cuts to the halfway mark. These little strips will be the straw hair. Fold them down flat and arrange. Then cut a hat out of your construction paper and decorate it. Glue it over the flattened hair. Draw a face, and use construction paper to create a triangle nose and circle cheeks. Glue them on and enjoy your scarecrow!

Leaf Pumpkins

For this craft you will need cardstock, leaves, liquid glue, and a scissor. You also will want something for a stem and vine, and you may use string, brown paper, or just color it. We used leftover packing material for ours.

Gather some leaves and be sure they are dry. Cut a pumpkin shape out of your cardstock. Arrange your leaves and stem materials on your pumpkin to decide how you want them to look. Then glue everything down.

Packing Peanut Building/Sculpture Challenge

All you need for this craft is water biodegradable packing peanuts. These packing peanuts dissolve in water. You will use the packing peanuts and by dabbing your finger in water and lightly rubbing the end of two packing peanuts, you can get them to stick together without fully dissolving. If you would like to sculpt animals or figures, you may want to add details with markers. Have fun!! If you want to make your sculpture disappear, just add water!

A pine tree

Worry Hearts

Carry these hearts with you to keep worries at bay. This craft is especially useful for the first day of school, but can be used for any time! It would also make a heartfelt gift! ( no pun intended!) There are a few different ways you can use this project and feel free to customize it to your liking.

Worry hearts work as a tangible thing that your child can hold on to when they are nervous to help relieve their anxiety. It is a great tool to have with them. Whenever they feel they need a boost of encouragement, all they have to do is pull a heart from their bag and either hold it in their hand or put it in their pocket.

The heart shape reminds them that they are loved even when they can’t be close to you. When filling the bag, you can tell your child something you love about them for each heart as it goes in.
To make:

You will need a scissor, felt, glue, a small pouch, and any glitter or markers you would like to add extra enhancements to your bag or hearts.

Cut different-sized hearts out of the included felt. You can fold it in half and cut to get the most even shaped hearts. If you would like to decorate them further, now would be the time to do so.

Save one heart and glue it onto your bag. Decorate the bag any way that you wish. Once the hearts are dry, place them in the bag. As mentioned above, you could tell your child something you love about them for each heart as you put it in the bag. Send the bag with them, and they can grab a heart when they need!!!