Baby Chick Craft

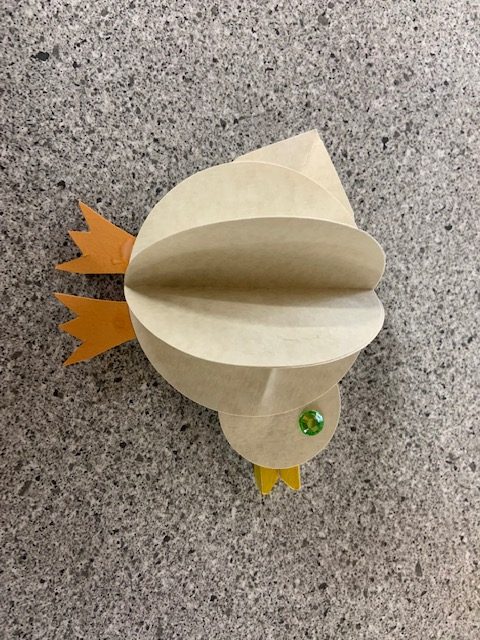
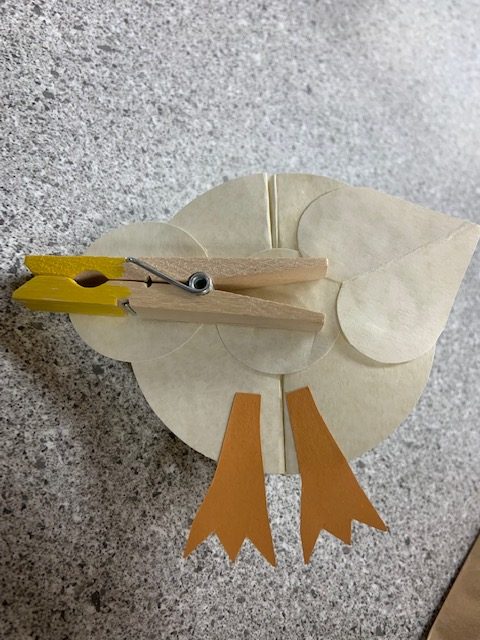
For this craft, you will need liquid glue, a wooden clothespin, scissors, a jewel or googly eye, cardstock paper, and a yellow marker. We used an off-white color for the body and orange for the feet. To start, cut your circles. You will need three large, two smaller, and a heart the same size as the smaller circles. Then cut feet out of the orange paper. Next, color the open end of the clothespin yellow. Then take your three big circles and fold them in half. Glue them together to create a 3-D shape as the picture shows.

Then take one of the smaller circles and glue it on the back. Then glue the other one on as a head. Glue your clothespin onto the back making sure the yellow beak sticks out from the head. Then cut a heart out of your white square and glue onto the back for a tail (the tip of the heart is the tail). Then cut two feet out of the orange square and glue those on the bottom. Lastly, stick your jewel on for an eye. Let the project dry.

Front of chick
Back of chick

Tuesday Take-n-Make

This week we have put out an assortment of leftover crafts from our Family Story Times. Feel free to take what you need!

Pie Day at the Library

Today is March 14th, or 3.14, which represents the symbol Pi (Greek letter “π”) that is used in mathematics to represent a constant — the ratio of the circumference of a circle to its diameter — which is approximately 3.14159. This number will continue infinitely without repetition or pattern. Join us in celebrating this day with pie!!!

Stop in at the library for a piece of pie, this free-will offering event will start at noon and go until we run out!

There will be no new Tuesday Take-n-Make craft, but feel free to grab some of our previous crafts in the bin. Here are a few fun activities to celebrate Pi Day at home!

Pie coloring page

Apple Pie Play Dough

2 cups baking soda

1 cup cornstarch

1.5 cups water

1 Tablespoon vegetable Oil

Food coloring – we used red

1 Tablespoon cinnamon + 1 Tablespoon allspice (cake spice / Christmas spice)

Instructions:

  1. Add all the ingredients to a pot – except the spices, the spices get added last when kneading!
  2. If you would like to add food coloring – add it to the water before you start cooking – it is so much easier this way – rather than kneading in at the end!
  3. Stir well before cooking. The cornflour will initially be hard to stir, but it will all come together and turn into a runny liquid.
  4. Put it onto the stove and cook until it turns into a thick mush – and becomes really hard to stir.
  5. It will still be a little more sticky than the play dough will end up once it is cooled and kneaded.
  6. Set aside for a few minutes and knead when cool enough to touch.
  7. At this point, if you would like to add an apple pie scent – add in the spice and knead further.

Enjoy!

Snowflake Craft

For this craft, you will need white coffee filters, a scissor, water, washable markers (you will also need a spoon or spray bottle for the marker method) or watercolor paint, and a surface to dry your snowflakes on.

To start, you will take a coffee filter and decorate it with your markers or watercolors. If using markers, once you have your design, either spray or gently spoon water onto the coffee filter. You definitely do not want it to be sopping wet or you will lose color. Once you are satisfied with how it looks, let it dry overnight.

Next, you will fold your coffee filter as such:

 Fold the coffee filter in half.

Then fold the right corner of the coffee filter to the left so that it is 1/3 of the way over.

Fold the left corner of the coffee filter so that the edges line up on the right. (If you open it up to check, you should have perfect thirds.)

Fold the coffee filter in half one last time.

Then cut in your snowflake designs on the edges. Open your filter and admire your beautiful work! Hang in the window if you like.

Bunny Hop Craft

For this craft, you will need two paper cups, two rubber bands ( You want them to be a bit longer than the width of the cup), a scissor, glue, and markers.

Take one of your two cups. Cut 4 slits evenly spaced around the base. Take one rubber band and cut it so it is one long piece. Tie a knot at each end, and thread it through two slits that are across from each other. (So the knot will be sticking out of the cup as shown in the picture.) Do this for the other rubber band.

Then decorate this cup to create the bunny. There is paper included to make ears (glue them on the top), googly eyes for the face, and then you can draw on the nose and decorate the ears.

Once your bunny is decorated, you can stack that cup on top of the other one. It may take some practice, but if you push down on the top cup and let go quickly, your bunny will hop. Experiment to find the best way for it to work.

Woven Hearts

For this craft you will need a scissor, red and white paper, and any kind of decorating supplies you want to use for your heart. Take the template below, and use it to cut out a red heart half and a white half. Then, weave the loose ends together to make your heart. Draw, paint, or glitter up your heart however you wish. I used markers on mine. Display or give to someone you love!

Happy Valentine’s Day!!!

Tuesday Take-n-Makes are Back!

Hearts String Art

For this week’s craft, we will be making heart collages with string and glitter. All you will need is liquid glue! Arrange your string on your paper, making heart shapes. Then glue it down. Use your glue to gently draw designs where you would like glitter. Let it dry and hang it up, or give to someone you love!

Tuesday Take-n-Makes are put out every Tuesday by 1pm. They are first come, first serve, so once they are gone, they are gone. You can find the Take-n-Makes out front of the library in the brown bin closest to our book return!

Gingerbread Craft

You will need crayons or markers, a scissor, glue, and various decorations like buttons, craft paper, pipe cleaners, etc. Whatever you would like to decorate your gingerbread with.

Here is the template. Cut out your gingerbread either on brown paper or just color it. Then start decorating. You can also design a house with a brown paper bag or just draw one!

Penguin Craft

For this craft you will need scissors, glue, white, black, and orange construction paper, and a marker.

Start by cutting out your shapes. Use the black construction paper to cut the wings and body. Then cut out a smaller body in white. Use the orange for feet and a beak. Glue your penguin together and lastly, draw on the eyes.