Paper Flowers

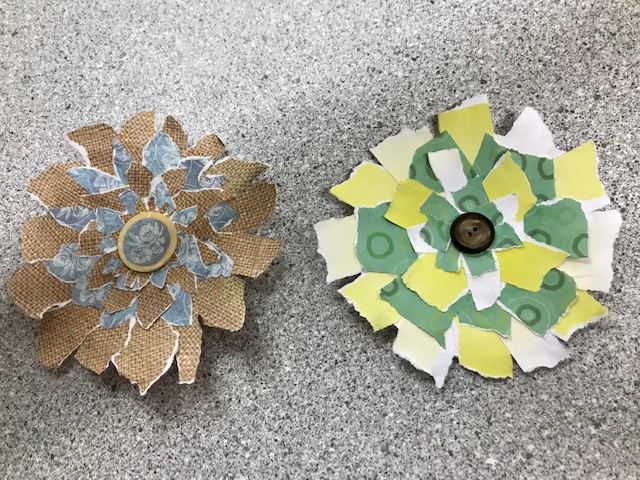
You will need a scissor, a paper circle template, colored paper in various patterns, and liquid glue to complete this project.

First, cut out your cardstock circle. Then you will take your colorful patterned paper and tear off petals. Glue the petals onto the cardstock in layers, starting on the outer edge of the circle and working your way towards the center. Included is a button to glue in the center, or you can cut out paper to use.

Shamrock Wands

You will need a paper straw, a shamrock cut out of green paper, streamer material (can be paper strips, string, ribbon, etc.), and glitter. You will need a scissor and liquid glue.

Cut your shamrock out and glue it to the top of your paper straw. Then cut the streamers and glue them on the back of the shamrock. Lastly, add glitter and let the wand dry.

Straw Airplanes

This week we are making straw airplanes. All you will need is a regular-sized sheet of paper or cardstock, four straws, scissor, tape, and markers etc. to decorate.

First, you will take each strip of paper and decorate them however you wish. Then tape the ends together, forming a circle.

Next, take your 4 straws and cut the bendy part off of each one. Tape each straw, evenly spaced apart, to the inside of the bigger paper circle just as the picture shows.

Then tape the straws to the outside of the smaller paper circle at the top, once again evenly spacing:

Your airplane is ready to fly! Which way does it fly the best? Does it fly better throwing it with the larger end forward, or the smaller end? Why do you think that is?

CD Case Mazes

For our Tuesday Take-n-Make this week, we are making CD case mazes. You will need an empty CD case, wax sticks (also called Wikki Stix or Monkey String), or you can use hot glue and pipe cleaners, permanent markers to decorate with, and a marble.

First, decorate your case however you wish, sharpies work well for this. Then use your wax sticks to create your maze walls. Press the sticks in various ways to create a track. Make sure you have enough space for your marble to get through. Then test out your track!

Valentine Yarn Hearts

You will need a pencil or marker, yarn, wax paper, liquid glue, a fork and bowl, and scissors. Glitter is optional. This is a slightly messy project.

Take your wax paper and spread it out on a flat surface. Use the marker or pencil to draw heart outlines. These outlines will be your guide for the yarn heart, so make them big enough that you can arrange your yarn inside.

Next, you will pour liquid glue into the bowl and add pieces of yarn. If you want to trim some of the yarn pieces smaller first, you may do that. Use the fork to mix them up so they get evenly coated in glue. Then you will squeeze out any excess glue and arrange them inside your heart outlines on the wax paper. If you would like to sprinkle some glitter on, this would be the time to do it. Then let the hearts dry overnight. Once they have dried, take some yarn or string and cut it to size to hang your work!

Drive-by for Pie Library Fundraiser

Darn this COVID-19! Our usual Pi Day Pie Day held each March 14th was a no-go this year. What to do? Let’s move the Pie Day outside and celebrate Earth Day instead!

Come join us on Thursday, April 22nd at 11:30 AM for homemade PIE! Library volunteers will have pie to go until it’s all gone. Free will offering with all proceeds going toward the Summer Reading Challenge program for Children, Teens and Adults.

We will have other baked goods available as well.

Print and color (or not)

Ok here’s your challenge: we’ve started this drawing now it’s up to you to finish it. How will you do that? Will you continue using a black marker and add more lines? A bevy of geometric motifs? Or will you add COLOR? Maybe just black, white and red? Or an explosion of the color wheel? It’s all up to you!

We want to see your finished work! Share on social media with the hashtag #BOCOmakeanddo