Spring Flowers

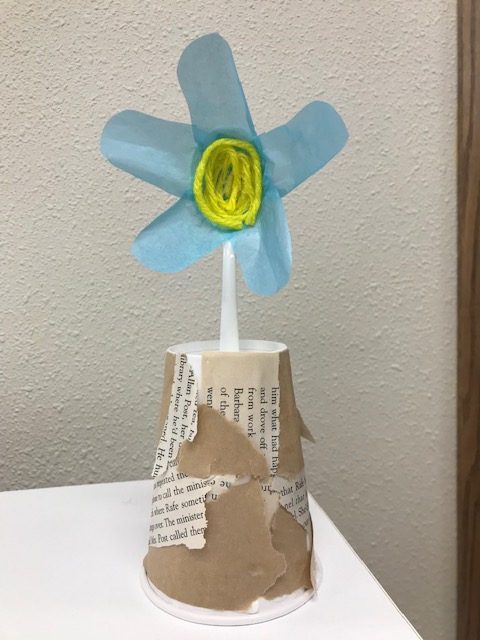
Before we move on from flowers, we are offering one last flower craft to remind us spring is arriving. For this one you will need a paper cup, a plastic spoon, liquid glue, yarn, old book pages, tissue paper, and a scissor. You can also choose to use paint, crayons, markers, etc. to further decorate your flower pot.

First, take your tissue paper and cut petal designs out so that you end up with 4-5 petals. Glue them onto the front of the spoon where it is concave). Then you will add glue to the center of the spoon and add your yarn in a spiral to create the flower center. Cut any excess yarn you don’t need.

While that dries, decorate your pot. The cup will be upside down. You can tear pieces of book pages to decorate your cup ( we also used our paper bags the take-n-makes come in), or if you want to paint or color it, feel free to do so! Once it is decorated, you will poke a small hole on the bottom of the cup in the center (which is now the top) and stick your spoon in there.

Paper Flowers

You will need a scissor, a paper circle template, colored paper in various patterns, and liquid glue to complete this project.

First, cut out your cardstock circle. Then you will take your colorful patterned paper and tear off petals. Glue the petals onto the cardstock in layers, starting on the outer edge of the circle and working your way towards the center. Included is a button to glue in the center, or you can cut out paper to use.

Shamrock Wands

You will need a paper straw, a shamrock cut out of green paper, streamer material (can be paper strips, string, ribbon, etc.), and glitter. You will need a scissor and liquid glue.

Cut your shamrock out and glue it to the top of your paper straw. Then cut the streamers and glue them on the back of the shamrock. Lastly, add glitter and let the wand dry.

Straw Airplanes

This week we are making straw airplanes. All you will need is a regular-sized sheet of paper or cardstock, four straws, scissor, tape, and markers etc. to decorate.

First, you will take each strip of paper and decorate them however you wish. Then tape the ends together, forming a circle.

Next, take your 4 straws and cut the bendy part off of each one. Tape each straw, evenly spaced apart, to the inside of the bigger paper circle just as the picture shows.

Then tape the straws to the outside of the smaller paper circle at the top, once again evenly spacing:

Your airplane is ready to fly! Which way does it fly the best? Does it fly better throwing it with the larger end forward, or the smaller end? Why do you think that is?

CD Case Mazes

For our Tuesday Take-n-Make this week, we are making CD case mazes. You will need an empty CD case, wax sticks (also called Wikki Stix or Monkey String), or you can use hot glue and pipe cleaners, permanent markers to decorate with, and a marble.

First, decorate your case however you wish, sharpies work well for this. Then use your wax sticks to create your maze walls. Press the sticks in various ways to create a track. Make sure you have enough space for your marble to get through. Then test out your track!

Valentine Yarn Hearts

You will need a pencil or marker, yarn, wax paper, liquid glue, a fork and bowl, and scissors. Glitter is optional. This is a slightly messy project.

Take your wax paper and spread it out on a flat surface. Use the marker or pencil to draw heart outlines. These outlines will be your guide for the yarn heart, so make them big enough that you can arrange your yarn inside.

Next, you will pour liquid glue into the bowl and add pieces of yarn. If you want to trim some of the yarn pieces smaller first, you may do that. Use the fork to mix them up so they get evenly coated in glue. Then you will squeeze out any excess glue and arrange them inside your heart outlines on the wax paper. If you would like to sprinkle some glitter on, this would be the time to do it. Then let the hearts dry overnight. Once they have dried, take some yarn or string and cut it to size to hang your work!